MDeamon – E-Mail server software for windows

Daemon Messaging Server, email server software, is a trusted alternative to Microsoft Exchange or SBS. MDaemon mail server supports IMAP, SMTP, POP3, and ActiveSync protocols and delivers solid performance from its feature-rich and user-friendly design.

09092004-1

1. To add new user: Accounts>>New account

Note: to disable strong password: Accounts>>Account Options>>Password>>uncheck Require strong password

2. To set port for web mail: Setup>>Web & IM Services>>Web Server>>set port

09092014-2

EX: your domain is duyvd.com, you mail address will be mail.duyvd.com:8888

09091014-3

Just login and send test mail 🙂

Have a good time 🙂

Samba on SentOS 6.5

Samba được dùng để cho phép các users chia sẻ và sử dụng files, thư mục và máy in giữa Linux và Windows.

Samba server:

Operating system : CentOS 6.5
Hostname : sambaserver.lab
IP Address : 192.168.1.16/24

 Samba client:

Operating system : Windows 7 Professional
Hostname : client
IP Address : 192.168.1.1/24

Cài đặt Samba trên Server

[root@sambaserver ~]# yum install samba* -y

Cấu hình thư mục chia sẻ đẩy đủ quyền truy cập

Tạo thư mục /samba/share/ với full permission

[root@sambaserver ~]# mkdir -p /samba/share
[root@sambaserver ~]# chmod 777 /samba/share

Sửa và thêm các dòng sau vào file cấu hình samba

[root@sambaserver ~]# vi /etc/samba/smb.conf
#dòng 58 - Thêm những dòng sau ở dòng 58
unix charset = UTF-8
dos charset = CP932
#dòng 75 - đổi thành WORKGROUP
workgroup = WORKGROUP
#dòng 81 - Bỏ comment và chỉnh sửa lại IP range
hosts allow = 127. 192.168.8
#dòng 102 - đổi thành không cần xác thực
security = share
# Thêm những dòng sau ở cuối file 
[myshare]
path = /samba/share
writable = yes
browsable = yes
guest ok = yes
guest only = yes
create mode = 0777
directory mode = 0777

:wq # lưu lại

Start Samba Server

[root@sambaserver ~]# service smb start
Starting SMB services: [ OK ]
[root@sambaserver ~]# service nmb start
Starting NMB services: [ OK ]
[root@sambaserver ~]# chkconfig smb on
[root@sambaserver ~]# chkconfig nmb on

Test the Samba server

Chúng ta có thể kiểm tra cấu hình Samba server bằng lệnh testparm

[root@sambaserver ~]# testparm
Load smb config files from /etc/samba/smb.conf
rlimit_max: increasing rlimit_max (1024) to minimum Windows limit (16384)
Processing section "[homes]"
Processing section "[printers]"
Processing section "[myshare]"
WARNING: The security=share option is deprecated
Loaded services file OK.
Server role: ROLE_STANDALONE
Press enter to see a dump of your service definitions

[global]
 dos charset = CP932
 server string = Samba Server Version %v
 security = SHARE
 log file = /var/log/samba/log.%m
 max log size = 50
 idmap config * : backend = tdb
 hosts allow = 127., 192.168.8
 cups options = raw

[homes]
 comment = Home Directories
 read only = No
 browseable = No

[printers]
 comment = All Printers
 path = /var/spool/samba
 printable = Yes
 print ok = Yes
 browseable = No

[myshare]
 path = /samba/share
 read only = No
 create mask = 0777
 directory mask = 0777
 guest only = Yes
 guest ok = Yes

Thêm Rules trong iptables để cho các users bên ngoài sử dụng dịch vụ Samba

[root@sambaserver ~]# vi /etc/sysconfig/iptables
# Firewall configuration written by system-config-firewall
# Manual customization of this file is not recommended.
*filter
# NetBIOS Name Service
-A INPUT -s 192.168.8.0/24 -m state --state NEW -m udp -p udp --dport 137 -j ACCEPT
# NetBIOS Datagram Service
-A INPUT -s 192.168.8.0/24 -m state --state NEW -m udp -p udp --dport 138 -j ACCEPT
# NetBIOS Session Service
-A INPUT -s 192.168.8.0/24 -m state --state NEW -m tcp -p tcp --dport 139 -j ACCEPT
# Microsoft Directory Service
-A INPUT -s 192.168.8.0/24 -m state --state NEW -m tcp -p tcp --dport 445 -j ACCEPT
 # Samba Web Administration
-A INPUT -s 192.168.8.0/24 -m state --state NEW -m tcp -p tcp --dport 901 -j ACCEPT


:INPUT ACCEPT [0:0]
:FORWARD ACCEPT [0:0]
:OUTPUT ACCEPT [0:0]
-A INPUT -m state --state ESTABLISHED,RELATED -j ACCEPT
-A INPUT -p icmp -j ACCEPT
-A INPUT -i lo -j ACCEPT
-A INPUT -m state --state NEW -m tcp -p tcp --dport 22 -j ACCEPT
-A INPUT -j REJECT --reject-with icmp-host-prohibited
-A FORWARD -j REJECT --reject-with icmp-host-prohibited
COMMIT

:wq #lưu lại

Restart iptables to save the changes

[root@sambaserver ~]# service iptables restart
iptables: Setting chains to policy ACCEPT: filter [ OK ]
iptables: Flushing firewall rules: [ OK ]
iptables: Unloading modules: [ OK ]
iptables: Applying firewall rules: [ OK ]

Disable SELINUX

# This file controls the state of SELinux on the system.
# SELINUX= can take one of these three values:
# enforcing - SELinux security policy is enforced.
# permissive - SELinux prints warnings instead of enforcing.
# disabled - SELinux is fully disabled.
#SELINUX=enforcing
SELINUX=disabled
# SELINUXTYPE= type of policy in use. Possible values are:
# targeted - Only targeted network daemons are protected.
# strict - Full SELinux protection.
SELINUXTYPE=targeted

Cấu hình Server hoàn tất. Khởi động lại Server.


Bên Client

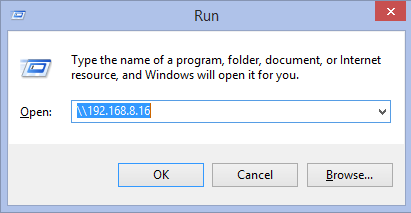
Click Start -> Run. Nhập vào địa chỉ IP của Samba Server như bên dưới.

1.8.2014


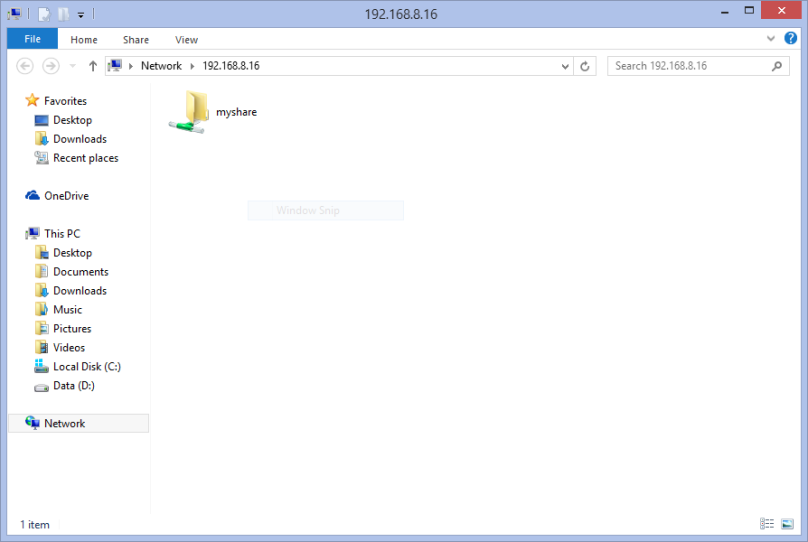
1.8.2014 2

Tạo folder và files thử xem 🙂

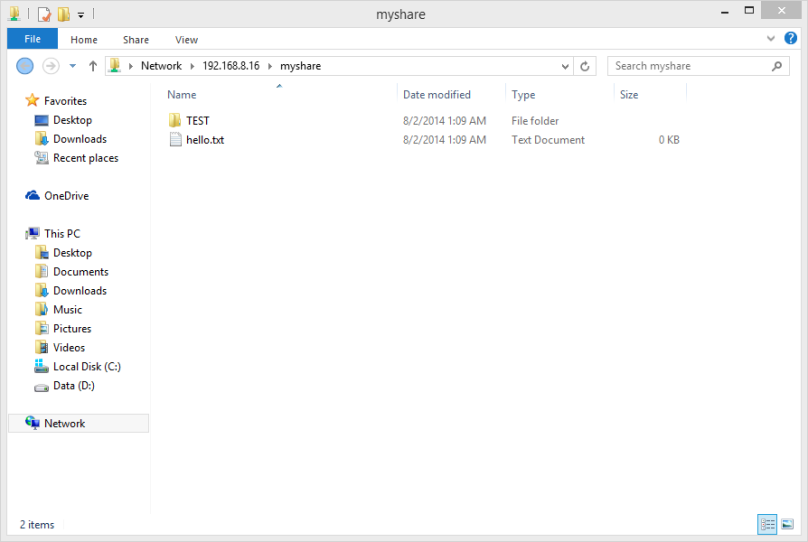
1.8.2014 3

Kiểm tra xem các files và folder vừa tạo có trên Samba Server hay ko? 😀

[root@sambaserver ~]# ls -l /samba/share/
total 4
-rwxrw-rw- 1 nobody nobody 0 Aug 1 14:09 hello.txt
drwxrwxrwx 2 nobody nobody 4096 Aug 1 14:09 TEST

Cấu hình 1 thư mục chia sẻ nhưng yêu cầu xác thực trên Samba Server

Tạo group samba và add các users vào

[root@sambaserver ~]# groupadd samba
[root@sambaserver ~]# useradd -g samba sb1
[root@sambaserver ~]# passwd sb1
Changing password for user sb1.
New password:
BAD PASSWORD: it is WAY too short
BAD PASSWORD: is too simple
Retype new password:
passwd: all authentication tokens updated successfully.

Tạo thư mục chia sẻ mới và phân quyền cho nó

[root@sambaserver ~]# mkdir /samba/share-auth
[root@sambaserver ~]# chmod 755 /samba/share-auth/
[root@sambaserver ~]# chown sb1:samba /samba/share-auth/

Thêm các dòng sau ở dưới cùng của file cấu hình samba

[root@sambaserver ~]# vi /etc/samba/smb.conf
[secure]
path = /samba/share-auth/
writable = yes
browsable = yes
guest ok =no
valid users = @samba

:wq #lưu lại

Kiểm tra lỗi file cấu hình bằng lệnh testparm

[root@sambaserver ~]# testparm
Load smb config files from /etc/samba/smb.conf
rlimit_max: increasing rlimit_max (1024) to minimum Windows limit (16384)
Processing section "[homes]"
Processing section "[printers]"
Processing section "[myshare]"
Processing section "[secure]"
WARNING: The security=share option is deprecated
Loaded services file OK.
Server role: ROLE_STANDALONE
Press enter to see a dump of your service definitions

[global]
 dos charset = CP932
 server string = Samba Server Version %v
 security = SHARE
 log file = /var/log/samba/log.%m
 max log size = 50
 idmap config * : backend = tdb
 hosts allow = 127., 192.168.8.
 cups options = raw

[homes]
 comment = Home Directories
 read only = No
 browseable = No

[printers]
 comment = All Printers
 path = /var/spool/samba
 printable = Yes
 print ok = Yes
 browseable = No

[myshare]
 path = /samba/share
 read only = No
 create mask = 0777
 directory mask = 0777
 guest only = Yes
 guest ok = Yes

[secure]
 path = /samba/share-auth/
 valid users = @samba
 read only = No

Restart samba server

[root@sambaserver ~]# service smb restart
Shutting down SMB services: [ OK ]
Starting SMB services: [ OK ]
[root@sambaserver ~]# service nmb restart
Shutting down NMB services: [ OK ]
Starting NMB services: [ OK ]

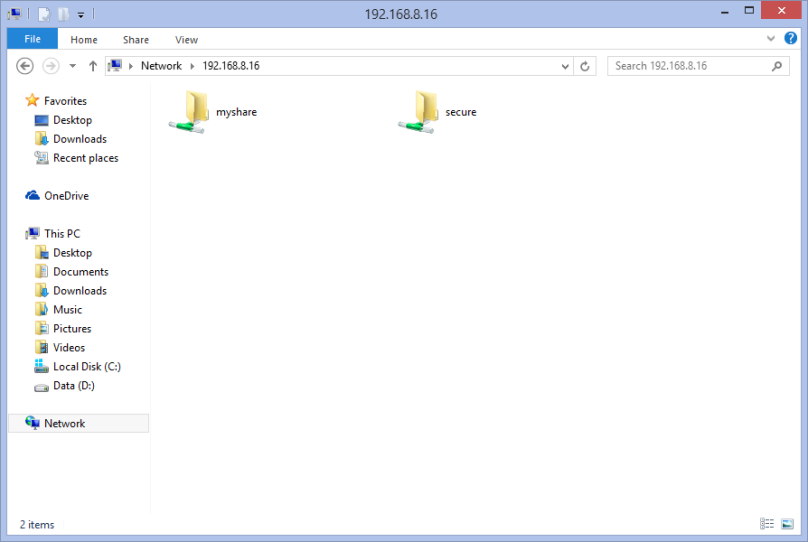
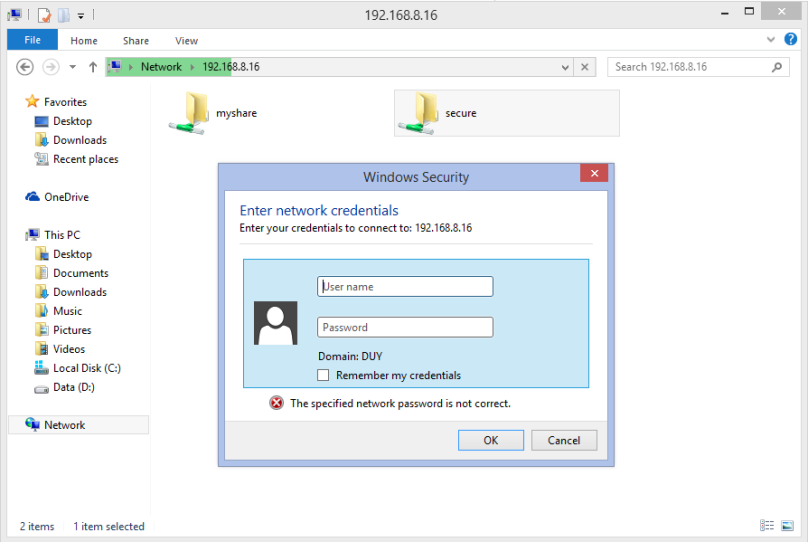
Bây giờ qua bên Client và truy cập thư mục share-auth

1.8.2014 4

1.8.2014 5

Lưu ý rằng chỉ cho phép users nằm trong Domain .lab mới vô được nhé!


Cấu hình Samba Server với GUI mode (chế độ giao diện)

cài đặt gói samba-swat

[root@sambaserver ~]# yum install xined samba-swat -y

Configure SWAT

[root@sambaserver ~]# vi /etc/xinetd.d/swat
# default: off
# description: SWAT is the Samba Web Admin Tool. Use swat \
# to configure your Samba server. To use SWAT, \
# connect to port 901 with your favorite web browser.
service swat
{
 port = 901
 socket_type = stream
 wait = no
 only_from = 127.0.0.1 192.168.8.0/24
 user = root
 server = /usr/sbin/swat
 log_on_failure += USERID
 disable = no
}

:wq #lưu lại

Restart samba and xinetd services

[root@sambaserver ~]# service xinetd restart
Stopping xinetd: [ OK ]
Starting xinetd: [ OK ]
[root@sambaserver ~]# service smb restart
Shutting down SMB services: [ OK ]
Starting SMB services: [ OK ]
[root@sambaserver ~]# service nmb restart
Shutting down NMB services: [ OK ]
Starting NMB services: [ OK ]

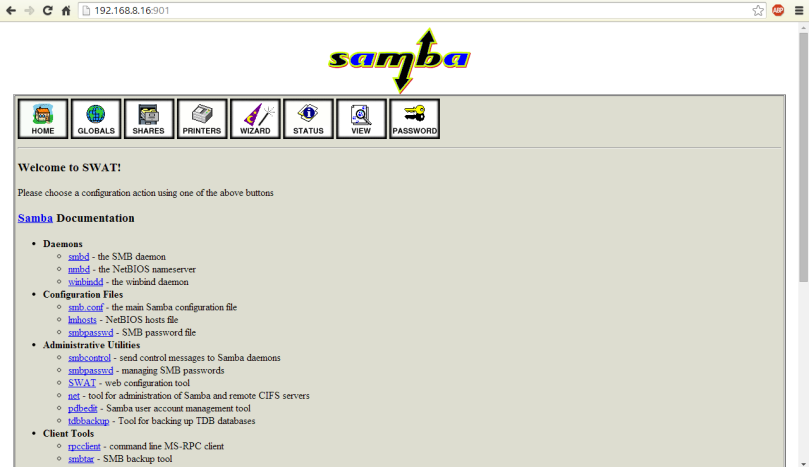
Mở trình duyệt Web từ Client và gõ địa chỉ “http://server-ip-address:901” . Sau đó thì có thể cấu hình Samba server ở đây!

1.8.2014 6

1.8.2014 7

Chúc các bạn thành công! 🙂


DNS Server on CentOS 6.5

Giới thiệu

Domain Name System (DNS) chuyển đổi hostnames hoặc URLs sang địa chỉ IP. Vì địa chỉ IP rất khó nhớ và không có thẩm mĩ 😀 nên chúng ta cần tới các Server DNS để chuyển đổi hostnames sang IP. Ví dụ: google.com.vn -> 173.194.127.55.


Primary(Master) DNS Server Details:

Operating System : CentOS 6.5 server
Hostname : masterdns.lab.com
IP Address : 192.168.1.100/24

Secondary(Slave) DNS Server Details:

Operating System     : CentOS 6.5 server
Hostname             : secondarydns.lab.com
IP Address           : 192.168.1.101/24

Client Details:

Operating System     : CentOS 6.5 Desktop  
Hostname             : client.lab.com
IP Address           : 192.168.1.102/24

Setup Primary(Master) DNS Server

[root@masterdns ~]# yum install bind* -y

Cấu hình DNS Server

[root@masterdns ~]# vi /etc/named.conf
//
// named.conf
//
// Provided by Red Hat bind package to configure the ISC BIND named(8) DNS
// server as a caching only nameserver (as a localhost DNS resolver only).
//
// See /usr/share/doc/bind*/sample/ for example named configuration files.
//
options {
 listen-on port 53 { 192.168.1.100; }; #Master DNS IP
 listen-on-v6 port 53 { ::1; };
 directory "/var/named";
 dump-file "/var/named/data/cache_dump.db";
 statistics-file "/var/named/data/named_stats.txt";
 memstatistics-file "/var/named/data/named_mem_stats.txt";
 allow-query { localhost;192.168.1.0/24; }; #Ip range
 allow-transfer {localhost;192.168.1.101; } #Slave DNS IP
 recursion yes;
dnssec-enable yes;
 dnssec-validation yes;
 dnssec-lookaside auto;
/* Path to ISC DLV key */
 bindkeys-file "/etc/named.iscdlv.key";
managed-keys-directory "/var/named/dynamic";
};
logging {
 channel default_debug {
 file "data/named.run";
 severity dynamic;
 };
};
zone "." IN {
 type hint;
 file "named.ca";
};
zone "lab.com" IN {
type master;
file "forward.lab";
allow-update {none; }
};
zone "1.168.192.in-addr.arpa" IN {
type master;
file "reverse.lab";
allow-update {none; }
};
include "/etc/named.rfc1912.zones";
include "/etc/named.root.key";

:wq #lưu lại

Tạo Zone Forward và Reverse đã đề cập trong file /etc/named.conf

Tạo Forward Zone

[root@masterdns ~]# vi /var/named/forward.lab
$TTL 86400
@ IN SOA masterdns.lab.com. root.lab.com. (
 2011071001 ;Serial
 3600 ;Refresh
 1800 ;Retry
 604800 ;Expire
 86400 ;Minimum TTL
)
@ IN NS masterdns.lab.com.
@ IN NS secondarydns.lab.com.
@ IN A 192.168.1.100
@ IN A 192.168.1.101
@ IN A 192.168.1.102
masterdns IN A 192.168.1.100
secondarydns IN A 192.168.1.101
client IN A 192.168.1.102

:wq #lưu lại

Tạo Reverse Zone

[root@masterdns ~]# vi /var/named/reverse.lab
$TTL 86400
@ IN SOA masterdns.lab.com. root.lab.com. (
 2011071001 ;Serial
 3600 ;Refresh
 1800 ;Retry
 604800 ;Expire
 86400 ;Minimum TTL
)
@ IN NS masterdns.lab.com.
@ IN NS secondarydns.lab.com.
@ IN PTR unixmen.local.
masterdns IN A 192.168.1.100
secondarydns IN A 192.168.1.101
client IN A 192.168.1.102
100 IN PTR masterdns.lab.com.
101 IN PTR secondarydns.lab.com.
102 IN PTR client.lab.com.

:wq #lưu lại

Start dịch vụ DNS

[root@masterdns ~]# service named start
[root@masterdns ~]# chkconfig named on

Sửa iptables để cho phép DNS server

[root@masterdns ~]# vi /etc/sysconfig/iptables
# Firewall configuration written by system-config-firewall
# Manual customization of this file is not recommended.
*filter
#nfs
-A INPUT -m state --state NEW -m tcp -p tcp --dport 2049 -j ACCEPT
#portmapper
-A INPUT -m state --state NEW -m tcp -p tcp --dport 111 -j ACCEPT
#mountd
-A INPUT -m state --state NEW -m tcp -p tcp --dport 48192 -j ACCEPT
#rquotad
-A INPUT -m state --state NEW -m tcp -p tcp --dport 875 -j ACCEPT

#DNS
-A INPUT -m state --state NEW -m tcp -p tcp --dport 53 -j ACCEPT
-A INPUT -m state --state NEW -m udp -p udp --dport 53 -j ACCEPT

:INPUT ACCEPT [0:0]
:FORWARD ACCEPT [0:0]
:OUTPUT ACCEPT [0:0]
-A INPUT -m state --state ESTABLISHED,RELATED -j ACCEPT
-A INPUT -p icmp -j ACCEPT
-A INPUT -i lo -j ACCEPT
-A INPUT -m state --state NEW -m tcp -p tcp --dport 22 -j ACCEPT
-A INPUT -j REJECT --reject-with icmp-host-prohibited
-A FORWARD -j REJECT --reject-with icmp-host-prohibited
COMMIT

:wq #lưu lại

Restart iptables

[root@masterdns ~]# service iptables restart
iptables: Setting chains to policy ACCEPT: filter [ OK ]
iptables: Flushing firewall rules: [ OK ]
iptables: Unloading modules: [ OK ]
iptables: Applying firewall rules: [ OK ]

Kiểm tra các file cấu hình và file zone có bị lỗi cú pháp hay không

[root@masterdns ~]# named-checkconf /etc/named.conf
[root@masterdns ~]# named-checkzone lab.com /var/named/forward.lab
zone lab.com/IN: loaded serial 2011071001
OK
[root@masterdns ~]# named-checkzone lab.com /var/named/reverse.lab
zone lab.com/IN: loaded serial 2011071001
OK

Test DNS server 

[root@masterdns ~]# dig masterdns.lab.com

; <<>> DiG 9.8.2rc1-RedHat-9.8.2-0.23.rc1.el6_5.1 <<>> masterdns.lab.com
;; global options: +cmd
;; Got answer:
;; ->>HEADER<<- opcode: QUERY, status: NOERROR, id: 5382
;; flags: qr rd ra; QUERY: 1, ANSWER: 1, AUTHORITY: 0, ADDITIONAL: 0

;; QUESTION SECTION:
;masterdns.lab.com. IN A

;; ANSWER SECTION:
masterdns.lab.com. 5 IN A 176.74.176.178

;; Query time: 2246 msec
;; SERVER: 192.168.8.2#53(192.168.8.2)
;; WHEN: Thu Jul 31 19:21:22 2014
;; MSG SIZE rcvd: 51
[root@masterdns ~]# nslookup lab.com
Server: 192.168.8.2
Address: 192.168.8.2#53

Non-authoritative answer:
Name: lab.com
Address: 176.74.176.178

Vậy là đã hoàn thành cấu hình trên Primary DNS server


Setup Secondary(Slave) DNS Server

[root@secondarydns ~]# yum install bind* -y

Configure Slave DNS Server

[root@secondarydns ~]# vi /etc/named.conf//
// named.conf
//
// Provided by Red Hat bind package to configure the ISC BIND named(8) DNS
// server as a caching only nameserver (as a localhost DNS resolver only).
//
// See /usr/share/doc/bind*/sample/ for example named configuration files.
//

options {
 listen-on port 53 { 192.168.1.101; };
 listen-on-v6 port 53 { ::1; };
 directory "/var/named";
 dump-file "/var/named/data/cache_dump.db";
 statistics-file "/var/named/data/named_stats.txt";
 memstatistics-file "/var/named/data/named_mem_stats.txt";
 allow-query { localhost; 192.168.1.0/24; };
 recursion yes;

 dnssec-enable yes;
 dnssec-validation yes;
 dnssec-lookaside auto;

 /* Path to ISC DLV key */
 bindkeys-file "/etc/named.iscdlv.key";

 managed-keys-directory "/var/named/dynamic";
};

logging {
 channel default_debug {
 file "data/named.run";
 severity dynamic;
 };
};

zone "." IN {
 type hint;
 file "named.ca";
};
zone "lab.com" IN {
type slave;
file "slaves/lab.fwd";
masters { 192.168.1.100; };
};
zone "1.168.192.in-addr.arpa" IN {
type slave;
file "slaves/lab.rev";
masters {192.168.1.100; };
};

include "/etc/named.rfc1912.zones";
include "/etc/named.root.key";

:wq #lưu lại

Start the DNS Service

[root@secondarydns ~]# service named start
Generating /etc/rndc.key: [ OK ]
Starting named: [ OK ]
[root@secondarydns ~]# chkconfig named on

Bây giờ forward và reverse zones được sao chép tự động từ Master DNS server vào /var/named/slaves/ trong Secondary DNS server .

[root@secondarydns ~]# ls /var/named/slaves/
lab.fwd lab.rev
[root@secondarydns ~]# cat /var/named/slaves/lab.fwd
$ORIGIN .
$TTL 86400 ; 1 day
lab.com IN SOA masterdns.lab.com. root.lab.com. (
 2011071001 ; serial
 3600 ; refresh (1 hour)
 1800 ; retry (30 minutes)
 604800 ; expire (1 week)
 86400 ; minimum (1 day)
 )
 NS masterdns.lab.com.
 NS secondarydns.lab.com.
 A 192.168.1.100
 A 192.168.1.101
 A 192.168.1.102
$ORIGIN lab.com.
client A 192.168.1.102
masterdns A 192.168.1.100
secondarydns A 192.168.1.101
[root@secondarydns ~]# cat /var/named/slaves/lab.rev
$ORIGIN .
$TTL 86400 ; 1 day
1.168.192.in-addr.arpa IN SOA masterdns.lab.com. root.lab.com. (
 2011071001 ; serial
 3600 ; refresh (1 hour)
 1800 ; retry (30 minutes)
 604800 ; expire (1 week)
 86400 ; minimum (1 day)
 )
 NS masterdns.lab.com.
 NS secondarydns.lab.com.
 PTR unixmen.local.
$ORIGIN 1.168.192.in-addr.arpa.
100 PTR masterdns.lab.com.
101 PTR secondarydns.lab.com.
102 PTR client.lab.com.
client A 192.168.1.102
masterdns A 192.168.1.100
secondarydns A 192.168.1.101

Add the DNS Server details to all systems

[root@secondarydns ~]# vi /etc/resolv.conf
# Generated by NetworkManager
search lab.com
nameserver 192.168.1.100
nameserver 192.168.1.101
nameserver 8.8.8.8

Test DNS server

[root@secondarydns ~]# dig masterdns.lab.com

; <<>> DiG 9.8.2rc1-RedHat-9.8.2-0.23.rc1.el6_5.1 <<>> masterdns.lab.com
;; global options: +cmd
;; Got answer:
;; ->>HEADER<<- opcode: QUERY, status: NOERROR, id: 43129
;; flags: qr aa rd ra; QUERY: 1, ANSWER: 1, AUTHORITY: 2, ADDITIONAL: 1

;; QUESTION SECTION:
;masterdns.lab.com. IN A

;; ANSWER SECTION:
masterdns.lab.com. 86400 IN A 192.168.1.100

;; AUTHORITY SECTION:
lab.com. 86400 IN NS masterdns.lab.com.
lab.com. 86400 IN NS secondarydns.lab.com.

;; ADDITIONAL SECTION:
secondarydns.lab.com. 86400 IN A 192.168.1.101

;; Query time: 3 msec
;; SERVER: 192.168.1.100#53(192.168.1.100)
;; WHEN: Thu Jul 31 20:31:07 2014
;; MSG SIZE rcvd: 108
[root@secondarydns ~]# dig secondarydns.lab.com

; <<>> DiG 9.8.2rc1-RedHat-9.8.2-0.23.rc1.el6_5.1 <<>> secondarydns.lab.com
;; global options: +cmd
;; Got answer:
;; ->>HEADER<<- opcode: QUERY, status: NOERROR, id: 1003
;; flags: qr aa rd ra; QUERY: 1, ANSWER: 1, AUTHORITY: 2, ADDITIONAL: 1

;; QUESTION SECTION:
;secondarydns.lab.com. IN A

;; ANSWER SECTION:
secondarydns.lab.com. 86400 IN A 192.168.1.101

;; AUTHORITY SECTION:
lab.com. 86400 IN NS secondarydns.lab.com.
lab.com. 86400 IN NS masterdns.lab.com.

;; ADDITIONAL SECTION:
masterdns.lab.com. 86400 IN A 192.168.1.100

;; Query time: 2 msec
;; SERVER: 192.168.1.100#53(192.168.1.100)
;; WHEN: Thu Jul 31 20:32:02 2014
;; MSG SIZE rcvd: 108
[root@secondarydns ~]# nslookup lab.com
Server: 192.168.1.100
Address: 192.168.1.100#53

Name: lab.com
Address: 192.168.1.102
Name: lab.com
Address: 192.168.1.100
Name: lab.com
Address: 192.168.1.101

Cấu hình trên Client

Thêm DNS server details trong file /etc/resolv.conf và tất cả máy Client

[root@client ~]# vi /etc/resolv.conf
# Generated by NetworkManager
search lab.com
nameserver 192.168.1.100
nameserver 192.168.1.101
nameserver 8.8.8.8

:wq # lưu lại

Test DNS

[root@client ~]# dig masterdns.lab.com

; <<>> DiG 9.8.2rc1-RedHat-9.8.2-0.17.rc1.el6_4.6 <<>> masterdns.lab.com
;; global options: +cmd
;; Got answer:
;; ->>HEADER<<- opcode: QUERY, status: NOERROR, id: 17253
;; flags: qr aa rd ra; QUERY: 1, ANSWER: 1, AUTHORITY: 2, ADDITIONAL: 1

;; QUESTION SECTION:
;masterdns.lab.com. IN A

;; ANSWER SECTION:
masterdns.lab.com. 86400 IN A 192.168.1.100

;; AUTHORITY SECTION:
lab.com. 86400 IN NS secondarydns.lab.com.
lab.com. 86400 IN NS masterdns.lab.com.

;; ADDITIONAL SECTION:
secondarydns.lab.com. 86400 IN A 192.168.1.101

;; Query time: 18 msec
;; SERVER: 192.168.1.100#53(192.168.1.100)
;; WHEN: Thu Jul 31 21:08:24 2014
;; MSG SIZE rcvd: 108
[root@client ~]# dig secondarydns.lab.com

; <<>> DiG 9.8.2rc1-RedHat-9.8.2-0.17.rc1.el6_4.6 <<>> secondarydns.lab.com
;; global options: +cmd
;; Got answer:
;; ->>HEADER<<- opcode: QUERY, status: NOERROR, id: 31050
;; flags: qr aa rd ra; QUERY: 1, ANSWER: 1, AUTHORITY: 2, ADDITIONAL: 1

;; QUESTION SECTION:
;secondarydns.lab.com. IN A

;; ANSWER SECTION:
secondarydns.lab.com. 86400 IN A 192.168.1.101

;; AUTHORITY SECTION:
lab.com. 86400 IN NS masterdns.lab.com.
lab.com. 86400 IN NS secondarydns.lab.com.

;; ADDITIONAL SECTION:
masterdns.lab.com. 86400 IN A 192.168.1.100

;; Query time: 15 msec
;; SERVER: 192.168.1.100#53(192.168.1.100)
;; WHEN: Thu Jul 31 21:08:58 2014
;; MSG SIZE rcvd: 108
[root@client ~]# dig client.lab.com

; <<>> DiG 9.8.2rc1-RedHat-9.8.2-0.17.rc1.el6_4.6 <<>> client.lab.com
;; global options: +cmd
;; Got answer:
;; ->>HEADER<<- opcode: QUERY, status: NOERROR, id: 7176
;; flags: qr aa rd ra; QUERY: 1, ANSWER: 1, AUTHORITY: 2, ADDITIONAL: 2

;; QUESTION SECTION:
;client.lab.com. IN A

;; ANSWER SECTION:
client.lab.com. 86400 IN A 192.168.1.102

;; AUTHORITY SECTION:
lab.com. 86400 IN NS secondarydns.lab.com.
lab.com. 86400 IN NS masterdns.lab.com.

;; ADDITIONAL SECTION:
masterdns.lab.com. 86400 IN A 192.168.1.100
secondarydns.lab.com. 86400 IN A 192.168.1.101

;; Query time: 3 msec
;; SERVER: 192.168.1.100#53(192.168.1.100)
;; WHEN: Thu Jul 31 21:09:33 2014
;; MSG SIZE rcvd: 131
[root@client ~]# nslookup lab.com
Server: 192.168.1.100
Address: 192.168.1.100#53

Name: lab.com
Address: 192.168.1.100
Name: lab.com
Address: 192.168.1.101
Name: lab.com
Address: 192.168.1.102

Vậy là Primary và Secondary DNS server đã sẵn sàng hoạt động.

Chúc các bạn thành công! 🙂

DHCP Server on CentOS 6.5

Giới thiệu

Dynamic HostConfiguration Protocol (DHCP) Server được dùng để cấp phát địa chỉ IP cho các máy Clients trong mạng LAN. DHCP server giảm gánh nặng cho System Admin khi phải cấu hình địa chỉ IP thủ công cho hệ thống có số lượng máy Client lớn.


Cài đặt DHCP server

[root@server1 ~]# yum install dhcp -y

Cấu hình

Việc cấu hình DHCP server rất dễ. Đầu tiên là phải xác định DHCP server chạy trên interface nào. Trong trường hợp của tôi thì sử dụng interface eth1. Để làm được điều đó thì phải chỉnh sửa file /etc/sysconfig/dhcpd

[root@server1 ~]# vi /etc/sysconfig/dhcpd
 # Command line options here
 DHCPDARGS=eth1

:wq #lưu lại

Copy file cấu hình mẫu vào thư mục /etc/dhcp

[root@server1 ~]# cp /usr/share/doc/dhcp-4.1.1/dhcpd.conf.sample /etc/dhcp/dhcpd.conf

Chỉnh sửa file /etc/dhcpd.conf

[root@server1 ~]# vi /etc/dhcp/dhcpd.conf
# option definitions common to all supported networks...
option domain-name "lab.com";
option domain-name-servers server1.lab.com;
# If this DHCP server is the official DHCP server for the local
# network, the authoritative directive should be uncommented.
authoritative;
# A slightly different configuration for an internal subnet.
 subnet 192.168.1.0 netmask 255.255.255.0 {
 range 192.168.1.100 192.168.1.200;
 option domain-name-servers server1.lab.com;
 option domain-name "lab.com";
 option routers 192.168.1.1;
 option broadcast-address 192.168.1.255;
 default-lease-time 600;
 max-lease-time 7200;
 }

:wq #lưu lại

Chú ý rằng có một số các entries không được sử dụng khác trong file dhspd.conf, hãy comment chúng. Nếu không thì bạn sẽ gặp vấn đề khi khởi động dịch vụ DHCP.

Start dịch vụ DHCP và cho phép chạy DHCP sau khi reboot

[root@server1 ~]# service dhcpd start
 Starting dhcpd: [ OK ]
[root@server1 ~]# chkconfig dhcpd on


Cấu hình trên Client

Renew Ip address interface eth1

[root@localhost ~]# ifconfig eth1 down
[root@localhost ~]# ifconfig eth1 up

Kết quả

[root@localhost ~]# ifconfig
 eth1 Link encap:Ethernet HWaddr 00:0C:29:36:30:53
 inet addr:192.168.1.100 Bcast:192.168.1.255 Mask:255.255.255.0
 inet6 addr: fe80::20c:29ff:fe36:3053/64 Scope:Link
 UP BROADCAST RUNNING MULTICAST MTU:1500 Metric:1
 RX packets:186 errors:0 dropped:0 overruns:0 frame:0
 TX packets:135 errors:0 dropped:0 overruns:0 carrier:0
 collisions:0 txqueuelen:1000
 RX bytes:24006 (23.4 KiB) TX bytes:17650 (17.2 KiB)
 Interrupt:19 Base address:0x2080

Chúc các bạn thành công! 🙂

NFS on SentOS 6.5

Giới thiệu

Network File System (NFS) là 1 giao thức server-client được dùng để chia sẻ file giữa hệ thống linux/unix với nhau. NFS cho phép mount một thư mục từ xa đã được chia sẻ trong mạng.


Cài đặt NFS trên Server

[root@server1 ~]# yum install nfs* -y

Start dịch vụ NSF

 [root@server1 ~]# service rpcbind start
 [root@server1 ~]# chkconfig rpcbind on
 [root@server1 ~]# service nfs start
 [root@server1 ~]# chkconfig nfs on

Cài đặt NSF trên Client

[root@localhost ~]# yum install nfs* -y

Start dịch vụ NFS

 [root@localhost ~]# service rpcbind start
 [root@localhost ~]# chkconfig rpcbind on
 [root@localhost ~]# service nfs start
 Starting NFS services: [ OK ]
 Starting NFS quotas: [ OK ]
 Starting NFS mountd: [ OK ]
 Starting NFS daemon: [ OK ]
 Starting RPC idmapd: [ OK ]
 [root@localhost ~]# chkconfig nfs on

Tạo thư mục chia sẻ trên NFS SERVER

[root@server1 ~]# mkdir /var/share
[root@server1 ~]# chmod 755 /var/share/

Export shared directory on NFS Server

 [root@server1 ~]# vi /etc/exports
 /var/share/ 192.168.1.0/24(rw,sync,no_root_squash,no_all_squash)

:wq #lưu lại

Restart the NFS service

[root@server1 ~]# service nfs restart

Mount the share directory in CLIENT

[root@localhost ~]# mkdir /var/nfs-share
 [root@localhost ~]# mount -t nfs 192.168.1.12:/var/share /var/nfs-share/
 mount.nfs: Connection timed out

Chắc chắn rằng kết quả sẽ xuất hiện Connection timed out bởi vì Firewall đã chặn NFS server. Để cho phép NFS server được truy cập từ bên ngoài thì phải chỉnh sửa file /etc/sysconfig/iptables trên Server.

 [root@server1 ~]# vi /etc/sysconfig/iptables
 # Firewall configuration written by system-config-firewall
 # Manual customization of this file is not recommended.
 *filter
 #nfs
 -A INPUT -m state --state NEW -m tcp -p tcp --dport 2049 -j ACCEPT
 #portmapper
 -A INPUT -m state --state NEW -m tcp -p tcp --dport 111 -j ACCEPT
 #mountd
 -A INPUT -m state --state NEW -m tcp -p tcp --dport 48192 -j ACCEPT
 #rquotad
 -A INPUT -m state --state NEW -m tcp -p tcp --dport 875 -j ACCEPT
 :INPUT ACCEPT [0:0]
 :FORWARD ACCEPT [0:0]
 :OUTPUT ACCEPT [0:0]
 -A INPUT -m state --state ESTABLISHED,RELATED -j ACCEPT
 -A INPUT -p icmp -j ACCEPT
 -A INPUT -i lo -j ACCEPT
 -A INPUT -m state --state NEW -m tcp -p tcp --dport 22 -j ACCEPT
 -A INPUT -j REJECT --reject-with icmp-host-prohibited
 -A FORWARD -j REJECT --reject-with icmp-host-prohibited
 COMMIT

:wq #lưu lại

Nếu muốn biết tại sao lại mở các port đó thì hãy xem rpcinfo -p

[root@server1 ~]# rpcinfo -p | less

Restart dịch vụ iptables

 [root@server1 ~]# service iptables restart
 iptables: Setting chains to policy ACCEPT: filter [ OK ]
 iptables: Flushing firewall rules: [ OK ]
 iptables: Unloading modules: [ OK ]
 iptables: Applying firewall rules: [ OK ]

Mount lại thư mục chia sẻ ở phía Client

[root@localhost ~]# mount -t nfs 192.168.1.12:/var/share/ /var/nfs-share/

Kiểm tra xem mount thành công chưa thì dùng lệnh mount

[root@localhost ~]# mount
 /dev/mapper/vg_livedvd-lv_root on / type ext4 (rw)
 proc on /proc type proc (rw)
 sysfs on /sys type sysfs (rw)
 devpts on /dev/pts type devpts (rw,gid=5,mode=620)
 tmpfs on /dev/shm type tmpfs (rw,rootcontext="system_u:object_r:tmpfs_t:s0")
 /dev/sda1 on /boot type ext4 (rw)
 none on /proc/sys/fs/binfmt_misc type binfmt_misc (rw)
 sunrpc on /var/lib/nfs/rpc_pipefs type rpc_pipefs (rw)
 nfsd on /proc/fs/nfsd type nfsd (rw)
 192.168.1.12:/var/share/ on /var/nfs-share type nfs (rw,vers=4,addr=192.168.1.12,clientaddr=192.168.1.13)

Automount the Shares

Để mount thư mục chia sẻ một cách tự động sau mỗi lần reboot thì phải chỉnh sửa file /etc/fstab trên máy Client

[root@localhost ~]# vi /etc/fstab
 #
 # /etc/fstab
 # Created by anaconda on Wed Jul 30 20:07:26 2014
 #
 # Accessible filesystems, by reference, are maintained under '/dev/disk'
 # See man pages fstab(5), findfs(8), mount(8) and/or blkid(8) for more info
 #
 /dev/mapper/vg_livedvd-lv_root / ext4 defaults 1 1
 UUID=01c990e9-c6a2-430a-bb82-1b99154fe691 /boot ext4 defaults 1 2
 /dev/mapper/vg_livedvd-lv_swap swap swap defaults 0 0
 tmpfs /dev/shm tmpfs defaults 0 0
 devpts /dev/pts devpts gid=5,mode=620 0 0
 sysfs /sys sysfs defaults 0 0
 proc /proc proc defaults 0 0
 192.168.1.12:/var/share/ /var/nfs-share nfs rw,sync,hard,intr 0 0

:wq # lưu lại

Khởi động lại máy Client và kiểm tra mount

[root@localhost ~]# mount
 /dev/mapper/vg_livedvd-lv_root on / type ext4 (rw)
 proc on /proc type proc (rw)
 sysfs on /sys type sysfs (rw)
 devpts on /dev/pts type devpts (rw,gid=5,mode=620)
 tmpfs on /dev/shm type tmpfs (rw,rootcontext="system_u:object_r:tmpfs_t:s0")
 /dev/sda1 on /boot type ext4 (rw)
 none on /proc/sys/fs/binfmt_misc type binfmt_misc (rw)
 sunrpc on /var/lib/nfs/rpc_pipefs type rpc_pipefs (rw)
 192.168.1.12:/var/share/ on /var/nfs-share type nfs (rw,sync,hard,intr,vers=4,addr=192.168.1.12,clientaddr=192.168.1.13)
 nfsd on /proc/fs/nfsd type nfsd (rw)

Chúc các bạn thành công! 🙂

NIS on CentOS 6.5

Giới thiệu

Network Infomation Service (NIS) quản lý một cách tập trung thông tin xác thực và định danh như là các users và passwords, hosts và IP address và POSIX group. NIS lúc đầu được gọi là Yellow Pages (abbreviated YP) bởi vì sự đơn giản tập trung của nó trong việc tra cứu xác thực và định danh.

Để tạo môi trường Lab thuận lợi nhất cho việc cấu hình thì chúng ta nên tắt dịch vụ iptables ở cả máy Server và Client. Nếu có khả năng cấu hình iptables để cho NIS hoạt động thì chúng ta không nên tắt.
 [root@localhost ~]# service iptables stop
 iptables: Setting chains to policy ACCEPT: filter [ OK ]
 iptables: Flushing firewall rules: [ OK ]
 iptables: Unloading modules: [ OK ]

CẤU HÌNH NIS SERVER

Các Packages cần thiết

[root@localhost ~]# yum install yp* make* cach* xinetd –y

Kiểm tra các Packages đã được cài đặt hay chưa

[root@localhost ~]# rpm -qa nfs*
 nfs-utils-1.2.3-39.el6.i686
 nfs4-acl-tools-0.3.3-6.el6.i686
 nfs-utils-lib-1.1.5-6.el6.i686
[root@localhost ~]# rpm -qa yp*
 ypserv-2.19-26.el6_4.2.i686
 yp-tools-2.9-12.el6.i686
 ypbind-1.20.4-30.el6.i686
[root@localhost ~]# rpm -qa make*
 make-3.81-20.el6.i686
 makebootfat-1.4-10.el6.i686
[root@localhost ~]# rpm -qa cach*
 cachefilesd-0.10.2-1.el6.i686
[root@localhost ~]# rpm -qa xinetd
 xinetd-2.3.14-39.el6_4.i686

Kiểm tra file cấu hình

[root@localhost ~]# rpm -qlc ypserv
 /etc/rc.d/init.d/yppasswdd
 /etc/rc.d/init.d/ypserv
 /etc/rc.d/init.d/ypxfrd
 /etc/sysconfig/yppasswdd
 /etc/ypserv.conf
 /var/yp/Makefile
[root@localhost ~]# rpm -qlc ypbind
 /etc/yp.conf

Cấu hình NIS domain name và server

[root@localhost ~]# vi /etc/sysconfig/network
 NETWORKING=yes
 NETWORKING_IPV6=no
 HOSTNAME=server1.lab.com #HOSTNAME=localhost.domain_name
 NISDOMAIN=nisserver

:wq! # lưu lại

[root@localhost ~]# ypdomainname
 (none)
[root@localhost ~]# vi /etc/yp.conf
 # /etc/yp.conf - ypbind configuration file
 # Valid entries are
 #
 # domain NISDOMAIN server HOSTNAME
 # Use server HOSTNAME for the domain NISDOMAIN.
 #
 # domain NISDOMAIN broadcast
 # Use broadcast on the local net for domain NISDOMAIN
 #
 # domain NISDOMAIN slp
 # Query local SLP server for ypserver supporting NISDOMAIN
 #
 # ypserver HOSTNAME
 # Use server HOSTNAME for the local domain. The
 # IP-address of server must be listed in /etc/hosts.
 ypserver 192.168.8.12
 #
 # broadcast
 # If no server for the default domain is specified or
 # none of them is rechable, try a broadcast call to
 # find a server.
 #

:wq! # lưu lại

Tạo thư mục home cho từng nisusers

[root@localhost ~]# mkdir /nishome
 [root@localhost ~]# ll -dZ /home
 drwxr-xr-x. root root system_u:object_r:home_root_t:s0 /home
 [root@localhost ~]# ll -dZ /nishome
 drwxr-xr-x. root root unconfined_u:object_r:default_t:s0 /nishome
[root@localhost ~]# useradd -d /nishome/nisuser1 nisuser1
 [root@localhost ~]# useradd -d /nishome/nisuser2 nisuser2
 [root@localhost ~]# passwd nisuser1
 Changing password for user nisuser1.
 New password:
 BAD PASSWORD: it is based on a dictionary word
 Retype new password:
 passwd: all authentication tokens updated successfully.
 [root@localhost ~]# passwd nisuser2
 Changing password for user nisuser2.
 New password:
 BAD PASSWORD: it is based on a dictionary word
 Retype new password:
 passwd: all authentication tokens updated successfully.

Chia sẻ thư mục home NIS

[root@localhost ~]# vi /etc/exports
 /nishome 192.168.1.0/24(rw,wdelay,root_squash,no_subtree_check)

:wq! # lưu lại

[root@localhost ~]# exportfs -ar
[root@localhost ~]# exportfs -v
 /nishome 192.168.1.0/24(rw,wdelay,root_squash,no_subtree_check)
[root@localhost ~]# service nfs start
 Starting NFS services: [ OK ]
 Starting NFS quotas: [ OK ]
 Starting NFS mountd: [ OK ]
 Starting NFS daemon: [ OK ]
 Starting RPC idmapd: [ OK ]
[root@localhost ~]# chkconfig nfs on
[root@localhost ~]# showmount -e
 Export list for localhost.localdomain:
 /nishome 192.168.1.0/24

Khởi động dịch vụ NIS

[root@localhost ~]# service ypserv start
 Setting NIS domain name nisserver: [ OK ]
 Starting YP server services: [ OK ]
[root@localhost ~]# chkconfig ypserv on
[root@localhost ~]# ypdomainname #kiểm tra Domain name của NIS server
 nisserver
[root@localhost ~]# cd /var/yp/
 [root@localhost yp]# make
 gmake[1]: Entering directory `/var/yp/nisserver'
 Updating passwd.byname...
 Updating passwd.byuid...
 Updating group.byname...
 Updating group.bygid...
 Updating hosts.byname...
 Updating hosts.byaddr...
 Updating rpc.byname...
 Updating rpc.bynumber...
 Updating services.byname...
 Updating services.byservicename...
 Updating netid.byname...
 Updating protocols.bynumber...
 Updating protocols.byname...
 Updating mail.aliases...
 gmake[1]: Leaving directory `/var/yp/nisserver'
[root@localhost yp]# /usr/lib/yp/ypinit -m
At this point, we have to construct a list of the hosts which will run NIS
 servers. localhost.localdomain is in the list of NIS server hosts. Please continue to add
 the names for the other hosts, one per line. When you are done with the
 list, type a <control D>.
 next host to add: localhost.localdomain
 next host to add: server1.lab.com
 next host to add:
 The current list of NIS servers looks like this:
localhost.localdomain
 server1.lab.com
Is this correct? [y/n: y] y
 We need a few minutes to build the databases...
 Building /var/yp/nisserver/ypservers...
 Running /var/yp/Makefile...
 gmake[1]: Entering directory `/var/yp/nisserver'
 Updating passwd.byname...
 Updating passwd.byuid...
 Updating group.byname...
 Updating group.bygid...
 Updating hosts.byname...
 Updating hosts.byaddr...
 Updating rpc.byname...
 Updating rpc.bynumber...
 Updating services.byname...
 Updating services.byservicename...
 Updating netid.byname...
 Updating protocols.bynumber...
 Updating protocols.byname...
 Updating mail.aliases...
 gmake[1]: Leaving directory `/var/yp/nisserver'
localhost.localdomain has been set up as a NIS master server.
Now you can run ypinit -s localhost.localdomain on all slave server.
[root@localhost yp]# service yppasswdd start
 Starting YP passwd service: [ OK ]
 [root@localhost yp]#
 [root@localhost yp]# service ypbind start
 Starting NIS service: [ OK ]
 Binding NIS service: . [ OK ]
 [root@localhost yp]# service xinetd start
 Starting xinetd: [ OK ]
[root@localhost yp]# chkconfig yppasswdd on
 [root@localhost yp]# chkconfig ypbind on
 [root@localhost yp]# chkconfig ypxfrd on
 [root@localhost yp]# chkconfig xinetd on

CẤU HÌNH NIS CLIENT

Các Packages cần thiết

[root@localhost ~]# rpm -qa yp*
 yp-tools-2.9-12.el6.i686
 ypbind-1.20.4-30.el6.i686
[root@localhost ~]# authconfig-tui

Check vào [*] Use NIS -> Next -> Domain [nisserver]  ->  OK

IP của Server    [192.168.1.12]

[root@localhost ~]# vi /etc/auto.master
 #
 # Sample auto.master file
 # This is an automounter map and it has the following format
 # key [ -mount-options-separated-by-comma ] location
 # For details of the format look at autofs(5).
 #
 /nishome /etc/auto.misc
 #
 # NOTE: mounts done from a hosts map will be mounted with the
 # "nosuid" and "nodev" options unless the "suid" and "dev"
 # options are explicitly given.
 #
 /net -hosts
 #
 # Include central master map if it can be found using
 # nsswitch sources.
 #
 # Note that if there are entries for /net or /misc (as
 # above) in the included master map any keys that are the
 # same will not be seen as the first read key seen takes
 # precedence.
 #
 +auto.master

:wq! # lưu lại

[root@localhost ~]# vi /etc/auto.misc
 #
 # This is an automounter map and it has the following format
 # key [ -mount-options-separated-by-comma ] location
 # Details may be found in the autofs(5) manpage
cd -fstype=iso9660,ro,nosuid,nodev :/dev/cdrom
# the following entries are samples to pique your imagination
 #linux -ro,soft,intr ftp.example.org:/pub/linux
 #boot -fstype=ext2 :/dev/hda1
 #floppy -fstype=auto :/dev/fd0
 #floppy -fstype=ext2 :/dev/fd0
 #e2floppy -fstype=ext2 :/dev/fd0
 #jaz -fstype=ext2 :/dev/sdc1
 #removable -fstype=ext2 :/dev/hdd
 nisuser1 -rw,soft,intr 192.168.1.12:/nishome/nisuser1
 nisuser2 -rw,soft,intr 192.168.1.12:/nishome/nisuser2

:wq! # lưu lại

[root@localhost ~]# service autofs restart
 Stopping automount: [ OK ]
 Starting automount: [ OK ]

Kiểm tra

[root@localhost ~]# su nisuser1
 [nisuser1@localhost ~]$ pwd
 /nishome/nisuser1
[nisuser1@localhost ~]$ ypcat passwd
 nisuser1:$6$Iz4wLHZD$7rz6tDDygl6/Ani99MHVBdKNLP0yQJoo9Bn9CaZhtpyouBzckt47d69xic5TbnyzQS32pgCnayTS4x0NZnH2q1:500:500::/nishome/nisuser1:/bin/bash
 nisuser2:$6$re3PH5d/$JPtWi.FjG666uSDCUdiTOfvRUg6M02JKrvcIM9tJGFQOpiQIkyAs6wGLIBrdM.gg.LnVW9ipAl8ZAPcxnKFAe0:501:501::/nishome/nisuser2:/bin/bash

Chúc các bạn thành công! 🙂